Frequently asked questions (FAQ) Download the quick-start manual
Video tutorials
The Dashboard (Home page) contains different graphic and textual components with the key figures and trends of your company:

SELECTING THE REFERENCE PERIOD:
At the top of the page, the period (typically the Financial year) - can be chosen to show the corresponding information on the dashboard.
![]()
The chosen period applies both to the key figures (Revenue, Costs, Results) and to the graphs (Operating profit, Operating income and expenses, Cost allocation).
For your information
The figures in square brackets refer to the general ledger accounts as included in the accounting system for the accounts of your company or organization.
On the dashboard you will find typical revenue accounts, starting with 7 (for example [70]) and cost accounts, starting with 6 (for example [61]).
THE KEY FIGURES:

1.Yields
- The 'Operating income' indicator is composed of the sales accounts [70] and the other operating income [71 to 74] as recorded in the selected financial year.
- The 'Other income' indicator is composed of the Financial income [75] and the Extraordinary income [76] as recorded in the selected financial year.
- The 'Total revenue' indicator is composed of the operating income [70 to 74] and the other income [75].
2. Costs
- The indicator 'Operating costs' is made up of the cost accounts: Trade goods, raw materials and consumables [60], Services and miscellaneous goods [61], Remuneration, social security charges and pensions [62], Depreciation and remuneration [63] and Other operating expenses [64] as registered in the selected financial year.
- The 'Other costs' indicator is composed of the Financial costs [65] and the Exceptional costs [66] as recorded in the selected financial year.
- The 'Total costs' indicator is composed of the Operating costs [60 to 64] and the Other costs [65 and 66].
3. Result
- The 'Operating result' indicator gives the result of 'Operating income' less the 'Operating costs' for the selected financial year. This concerns the result (profit or loss) of the financial year before the processing of the financial and extraordinary income and expenses and before taxes.
- In the example: € 341.947,59 - € 337.653,01 = € 4.294,58
- The ‘Operating margin’ expresses the operating result as a percentage of operating income.
- In the example: € 4.294,58 / € 341.947,59 = 1,25%
- The <'Result before tax' indicator gives the result of the 'Total income' minus the 'Total costs' for the selected financial year. This concerns the result (profit or loss) of the financial year, including the financial and extraordinary income and costs, before the processing of taxes.
- In the example: € 341.997,41 - € 347.464,82 = - € 5.487,41
- ATTENTION In the course of the financial year, the operating result seldom includes all revenues and costs. For example, the 'Depreciation and write-offs [63]' are often only 'booked' at the end of the financial year or at the end of the year. The key figures 'Operating result' and 'Result before tax' are therefore rarely definitive in the current (and previous) financial year. In those years they are therefore preceded by the word 'Provisional'.
THE GRAPHIC COMPONENTS
A. Operating result per booking period
- This graph shows the difference between the operating income [revenue accounts 70-74] and the incurred operating costs [cost accounts 60-64] per booking period. If the difference between the two components is positive, the result is displayed as a green bar. If the result is negative, the result is displayed as a red bar.
- The result is shown per booking period. Depending on your accounting, these are months or quarters.
-
With the 'Flip' icon
 the figures from the graph are shown in tabular form.
- The graph can be enlarged with the help of the 'View' icon
 .
.
B. B. Operating income and expenses
- This graph shows the operating income [income statemen 70-74] and the incurred operating costs [cost accounts 60-64] per booking period. The operating income is presented in blue bars. The costs in orange bars.
- The result is shown per booking period. Depending on your accounting, these are months or quarters.
-
With the ‘Flip’ icon
the figures from the graph are shown in tabular form.
- The graphic can be enlarged with the help of the 'View' icon. .
C. Cost division - main categories
- Your account manager assigns main categories to all costs incurred [entries in the cost accounts 60-66]. These main sections provide a simplified and aggregated classification of the costs incurred.
- The graph shows the costs incurred in the selected financial year and divided into these main categories. The 5 categories with the highest cost percentage are visually represented in the graph. The other sections are summarized in a 6th component called 'Other'.
-
With the ‘Flip’ icon
the figures from the graph are shown in tabular form. This data table shows all main sections (maximum 16).
The items are sorted in descending order according to their amounts and percentages.
- De The main sections (in alphabetical order):
- Purchase of goods for resale
- Administration costs
- Depreciation and provisions
- Various operating costs
- Financial costs
- Housing
- Interim costs
- Costs manager(s) / director(s)
- Utilities
- Subcontracting
- Personnel and wage costs
- Restaurant and travel costs
- Telecommunication, software and hardware
- Sales and marketing
- Fleet
- Operation costs
C. Trend financial liquidity
- This graph shows the evolution of the financial liquidity of your company per booking period.
- The financial liquidity includes the bank balance at the credit institution(s), the postal check and any cash in hand [Calculation system: Class 5. Cash investments and cash. Accounts 55-57].
- The financial liquidity contains no shares, no other securities and no term deposits.
D. Trend operating result
- The 'Trend results' graph shows the operating result (generated revenue [revenue accounts 70-76] - the costs incurred [cost accounts 60-66]) over the last few quarters .
E. Receivables and debts
- 'Receivables' represent the 'outstanding customers'. This concerns the not yet paid (outgoing) sales invoices..
- A sales invoice is considered 'unpaid' in the accounting as long as no incoming payment has been registered for it (balance of the centralizing customer account '400000').
- The overdue receivables concern the unpaid invoices whose current date is more recent than the due date of the sales invoice. If no due date is specified in the accounting records, the document date is taken as the reference value.
- Note: The incoming payments are recorded in the accounts in the financial diaries on the basis of processed account statements. It is therefore important to interpret the number of invoices and the amounts of 'Receivables' together with the date Financial diaries updated to: that is displayed at the top of the dashboard.
- 'Debts' represent the 'outstanding suppliers'. This concerns the not yet paid (incoming) purchase invoices.
- A purchase invoice is considered 'unpaid' in the accounting as long as no outgoing payment has been recorded (balance of the centralizing vendor account '440000').
- The overdue debts concern the unpaid invoices whose current date is more recent than the due date of the underlying invoice. If no due date is specified in the accounting records, the document date is taken as the reference value.
- Note: Outgoing payments are recorded in the accounts in the financial diaries based on processed account statements. It is therefore important to interpret the number of invoices and the amounts of 'Debts' together with the date Financial diaries updated to: that is displayed at the top of the dashboard
F. Liquidity
- The 'liquidity' indicator shows the resources (in euros) that are immediately available or can be made available within the company in the short term.
- The formula that is used consists of three components:
- The bank balance at the credit institution (s), the postal check and any cash in hand [Calculation system: Class 5. Cash investments and cash. Accounts 55-57]. The evolution of this component is also represented graphically in the 'Trend financial liquidity'.
- Increased by the balance of the outstanding customers [Accounts 400 in +] and suppliers [Accounts 440 in -]. These are typically resources that are available in the short term. Both parts of this component are also shown at the left of the key figures 'Claims' and 'Debts'.
- Increased with the VAT Balance. This amount is composed of the 'VAT to be recovered' [Account 411] - the 'VAT payable' [Account 451]
Depending on your screen and the set resolution, it may be necessary to adjust the text size of the application so that the portal fits better on your screen.
This is best done via the following actions:
| Command | Met muis | Zonder muis |
|---|---|---|
| Reduce text size | Ctrl + Scroll down | Ctrl together with the t '-' character |
| Increase text size | Ctrl + Scroll up | Ctrl together with the '+' character |
Updating your accounting is done by your account manager.
You can determine yourself when the accounting has been updated for your account. To do this, two dates are displayed at the top of the Dashboard (Home page).
Both dates are important for a correct interpretation of the information that is read on the Dashboard and in the reports.
The dates are displayed in the blue toolbar at the top left or in the middle of the menu bar at the top:
 of
of 
Accounting updated to: dd/mm/20yy
-
We regularly update your accounting and ensure the processing and 'booking' of all accounting documents that reach us.
-
After processing the documents, we enter the date up to and including when your account was updated.
-
Note : All invoices that have been sent and relate to the period after the 'Accounting up to' date are also included in the portal and digital archive figures. In this way you always keep a complete view on the company results and the accounting of your company. It is therefore important to realize that this can temporarily give a 'provisional' picture of the results. After the processing of the most recent invoices corrections or adjustments can be made.
Financial diaries updated to: dd/mm/20yy
- This concerns the date of the last account statement that was processed in your accounting.
- The 'Trend financial liquidity', the 'Receivables' and 'Debts', and the core figure 'Liquidity' are directly dependent on this date.
- The information regarding 'Sales', 'Costs' and 'Result' are separate from this processing date.
![]()
You can report technical problems, suggestions or comments regarding the portal or the use of the application via the Feedback function.
Click on 'Feedback' (bottom left) to open a new screen in which you can indicate on which subject you want to give feedback and a text block in which you can describe the problem, suggestion or comment with more detail.
You may also wish to add an attachment.

There is no guarantee that all feedback will be processed immediately. It is, however, the case that all feedback that contributes to an improved operation of the application is highly appreciated and will be considered.
All questions or problems regarding your accounting should be passed on directly to your account manager via the Message function (see FAQ 6.).
If several companies and/or organizations were assigned to your user account, they can all be viewed within the same login session. Your Account has been created by your account manager and is unambiguously characterized by an email address and a password.
With the help of the selection list that appears at the top left , to the right of the logo of your office, you can select another company within the portal.

The application then takes a moment to load the Dashboard of the newly selected company.
All functions that are available within the portal now relate to the newly selected company (Reports, Archive, ...).

All questions, comments or problems regarding your accounting, the processing of your documents and / or the handling of your file can be passed on directly to your file manager via the Messages function.
When clicking on 'Messages', at the bottom left of the portal, a screen opens in which you can indicate which subject you want to contact your account manager and a text block in which you can describe your question or comment in more detail.

You can report technical problems, suggestions or comments regarding the portal or the use of the application via the Feedback function. (zie FAQ 4.).

With the Reports function you can create online reports that are always based on the most recent data in your accounting.
Several reports are made available in the 'Your Reports' list.
You select the desired report by:
- immediately click on the title of the report or the relevant report icon ![]() or
or
- first select the desired report from the 'Select report' list box:

Depending on the type of report, additional parameters are shown on the right under 'Generate report'.
These parameters must be determined via one or more selection lists (eg Financial year).

Once you have made the report choice and selected the parameter (s), click on the blue 'Generate' button..
Then you make a choice to open or save the pdf report. The way this happens depends on the Web browser that you use.
An Adobe Reader is required to open the pdf reports (www.adobe.com/be_en/products/reader.html).
You can easily email or print an (open) pdf report as an attachment.

On the basis of the Archive function you can consult and question your accounting file and archive online.
The invoices and documents available in the digital archive are divided into 4 domains (tabs):
- Purchase invoices
- Sales invoices
- Various documents
- Permanent file
![]()
- Purchase and Sales invoices
Within the archive you will find the basic information about the Purchase and Sales invoices.
This concerns, among other things: whether the invoice was paid or not, the general ledger account (s) on which the invoice was entered in the accounts and, if available, a link to the digitized document in pdf.
Looing up the invoices is done based on selection filters that can be set up separately or in combination with each other.
The most important filters are:
- Main section and Heading: It concerns a generic, aggregated level of accounting accounts. Selectable from a drop-down list.
- Supplier or Customer: : Depending on the search for purchase or sales invoices, the suppliers or customers can be selected from the selection list.
-
Documents available (Yes/No):
At 'Yes' only those invoices are retained for which a pdf document can be retrieved online. The digitized document is only available if it was delivered via AccBooks.
Documents that were delivered directly to our office or that we have collected directly through other channels are of course also stored digitally.
You can always ask us to provide a copy. - Already paid (Yes/No): At 'Yes' only those invoices that have already been paid according to your accounting will be retained. With 'No' only the unpaid invoices are retained.
- Credit note (Yes/No): With 'Yes' only the booked credit notes are retained. Under 'No' the credit notes are excluded from the results.
- Financial year: Het boekjaar geeft het jaar waarin de factuur werd geboekt.
- Book period: The financial year indicates the year in which the invoice was posted.
- The book period indicates the month or quarter within which the invoice was posted. Document number: For the purchase and sales invoices, this concerns the number by which the invoice was marked within the accounting. Only the numerical part of the Document Number must be entered. Not the diary that precedes the number.
For example: Document = ABAK-201500002. Search via Document Numer/search term:'2'
- Amount from-to: Finding invoices with a lower and / or upper limit of the invoice amount.
- Invoice date from-to: Selection of invoices for which the invoice date is within a certain period. Both dates can also be entered separately.
- Due date fom-to: : Searching for invoices with a due date within a certain period. Both dates can also be entered separately.
By default, the Archive 'Purchase Invoices' and 'Sales Invoices' opens with the unfiltered list of invoices sorted by invoice date (most recent invoice at the top).
- The complete results list can be followed through the arrows at the bottom of the page.
![]()
- The result list provides the following data for each document (invoice):
![]()
- Invoice date
- Document (= Diary + Document Number)
- Book period
- Invoice number
- Supplier or Customer
- Total incl. VAT (€)
- Expiration date
- Paid (Yes / No / ...) - Info depending on the date on which the financial diaries were updated.
- Processed (check mark that can be used to indicate that the document has been processed internally).
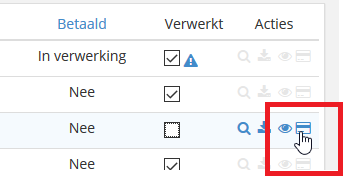
The following Actions are possible depending on whether or not the digitized document is available in pdf:
![]()
- Detail of the booking: Provides additional information regarding the booking of the document (including the item (s) or general ledger account (s) on which the invoice was posted). de boeking van het document (oa. de rubriek(en) of grootboekrekening(en) waarop de factuur werd geboekt).
- Download pdf: Allows you to reopen and / or download the digitally saved PDF document.
- Quick document preview: Gives a quick, less detailed view of the first page of the digitally stored document.
-
Various documents
Within the 'Various documents' archive, all documents are shown that have been digitally forwarded and not processed as purchase or sales invoices.
The archive shows the basic information of these documents as well as a link to the digitized document in pdf.
Searching for these documents is done by means of selection filters that can be entered individually or in combination with each other.
The most important filters are Type Document and Document date from-to.
By default, the 'Miscellaneous Documents' Archive opens with the unfiltered list of documents sorted by Document Date (most recent document at the top).
-
The results list provides the following data for each diverse document:
- Type of Document
- Name
- Document date
- Comments
The following Actions are possible depending on whether the digitized document is available in pdf:
![]()
- Download pdf: Allows you to reopen and / or download the digitally saved PDF document.
- Quick document preview: Gives a quick, less detailed view of the first page of the digitally stored document.
-
Permanent documents
Your account manager can decide to add certain documents that have been forwarded as 'Divers document' to the 'Permanent documents'. In this way the permanent nature of a document is recorded.
These are typically documents that exceed more than one book period (publications, contracts, agreements, reports, ...).
The tab 'Permanent documents' of the digital archive works identical to that of the 'Various documents'..
-
The result list provides the following data for each document assigned to the Permanent documents:
- Type of document (assigned by the account manager)
- Document name
- Document date
- Comments
Documents can be entered and digitized via various channels

Some input channels are controlled from the online portal (internal), while other channels ensure the input and digitization outside the portal (external).
-
Via a programmed network scanner (external)

If you use a (multifunctional) network printer / scanner connected to the internet and whose destination you can set manually, then you can use the unique e-mail addresses that you received via e-mail when you activated your user account.
For your information: You can also find the relevant e-mail addresses under Settings, at the top right of the choices under your username:

After the documents have been forwarded to one of these e-mail addresses, the digitized documents end up in the corresponding Digital mailbox of your portal: 'Purchase', 'Sales' or 'Various'.

The scanned documents are preferably sent in PDF format and with a resolution of at least 300 dpi (via settings of the scanner).
E-mail servers will prevent the forwarding of files > 25Mb. Take this as the absolute upper limit for the size of the files to be forwarded.
Note: When processing the documents, the files containing multiple documents / invoices will have to be (again) split up within the portal. In order not to aggravate the performance and the waiting time of this activity unnecessarily, the number of pages per scan turn is best limited to +/- 15.
-
Via a connected USB scanner (internal)

If you use a (desk) scanner that is connected to your computer via a USB port and has a TWAIN driver, you can control the scanner from the application to upload documents.

Zie FAQ Nr. 11: Which scanners can I connect?
Zie FAQ Nr. 12: How do I scan a document from the application?
-
Via Upload (internal)
Each PDF document placed on a location or in a folder accessible from the computer can be selected and uploaded to one of the digital mailboxes.

Zie FAQ Nr. 13: How do I upload a document?
-
Via Drag & Drop (internal)
Each PDF document placed on a location or in a folder accessible from the computer can be dragged to the portal and dropped in one of the digital mailboxes.
Drag/drag the PDF document over the desired mailbox on the left side of the menu bar and then release/drop.

- Via E-mail (external)
You can send a document or invoice by e-mail, with or without attachment, to one of the unique e-mail addresses that you received via e-mail when you activated your user account.
For your information: You can also find the relevant e-mail addresses under Settings, at the top right of the choices under your username:
After the relevant e-mail has been forwarded to one of these addresses:
-
Either prepare the PDF attachment of the e-mail in the relevant Digital mailbox
-
For your information: Even if the PDF-document is contained in a zip-file, the mail can immediately be forwarded to the relevant unique e-mail address. The pdf-document will be removed from the zip-file and prepared in the Digital mailbox (eg invoices from Total).

-
Either the html-email itself is converted into a pdf-document and prepared in the Digital mailbox and this in the absence of a pdf-attachment in the e-mail.
-
Either prepares an electronic invoice from the e-mail(in UBL/e-fff format) in the Digital mailbox.
-
Via Smartphone App (external)
Different Smartphone Apps allow you to take a photo or a scan of a document. From such Apps the photo or scan can be forwarded to one of the unique e-mail addresses of your account (Purchase, Sale, Various).
After the photo or scan has been forwarded to the portal, it will end up in the relevant Digital mailbox of the application as a PDF attachment.
Tips:
-
There are several scanning apps on the market that offer this basic function for free and are easy to use (eg CamScanner, Handyscan, Genius Scan, Office Lens, Google Drive, ...).
-
Try to set your unique email addresses as 'favorite' in the App or your Smartphone. This speeds up the use of this input channel.
-
Typically you use the Smartphone App for smaller documents such as there are: Reciepts from restaurants, gas station, car wash, ...
We expect to launch our own app by the end of 2018.
Scanners that are connected directly to the computer via a USB port and controlled from the portal must have a TWAIN driver. TWAIN is a technical standard for reading data via a scanner and managing it via a web application. Most scanners are delivered with a TWAIN driver, making them compatible with any TWAIN-compliant platform such as the underlying portal.
When you click the 'Scan documents' function within one of the Digital mailboxes, the application searches for the connected scanners with TWAIN driver.
![]()

If it turns out that the necessary TWAIN plugin has not yet been installed on the computer, the application will ask once to install the plugin that enables the connection with compatible scanners.
The installation procedure is highly dependent on the internet browser in which the portal runs.
Perform the download of the ImageCapture Suite plugin and, importantly (!), Then provide an update / refresh of the internet page.
Answer in the affirmative to the questions of your browser whether the Plugin may be activated each time the application is opened. Otherwise, the demand for downloading the Plug-In will be set again each time for safety reasons.


When the browser gives a warning regarding an ongoing script (see below), please click the 'Do not ask me again' check box and confirm via 'Continue':

Tip:
- Een A full update/refresh of the page is done in most browsers with the command <CTRL+F5>.
- With this command the entire page is recharged, including clearing the cache memory, which is essential for this action.
The scanner must now be recognized and appear in the list of available scanners.

Tip: If the scanner is not immediately recognized after the installation of the plugin, please unplug the scanner. Even closing the browser itself (or the computer) and starting it up again can ensure that the connection with the scanner is activated.
When using different internet browsers on the same computer, the plug-in for each of the browsers may be required separately.
It is strongly recommended to use a compatible internet browser to work smoothly with the portal and the web application.
The application has already been extensively and successfully tested with the following browsers:
- Internet Explorer: versions 9 and 10
- Mozilla Firefox: from version 16
- Google Chrome
- Opera: from version 10
- Safari: from version 7
Internet Explorer v11 identified compatibility issues with the built-in scanner software because of the 64-bit control of this browser.
Apple users who want to work with a USB-connected scanner are advised to use the browsers from google (chome) or Mozilla (firefox). It's own browser Safari, sometimes gives compatibility problems because of 64-bit control.
Tip: Experience shows that the internet browsers of Firefox and Chrome are the most compatible with the TWAIN drivers.
See also FAQ No. 12: How do I scan a document from the application?
Tip: Handy, cost-conscious TWAIN-compliant (desk) scanners that have proven their services:
-
Canon P-215 II
-
Brother ADS-1100W
To scan a document from the application, you use the 'Scan documents' function located at the top right within each Digital mailbox.
![]()

Within the selection list of scanners you first select the connected scanner to be used.
- Note: the connected scanner must be a TWAIN compatible scanner.
- See FAQ No. 11: Which scanners can I connect?
Then place the document to be scanned on the scanner. Depending on the capabilities of the scanner, multiple documents can be fed simultaneously (multifeed) and printed recto-verso.
With the blue Scan button you activate the scanner and the operating window of the scanner is displayed.
![]()
Start scanning by clicking the Scan or Start button on this control window.

The document is then read and displayed in the application.
When the scanning is finished you can close the operating screen of the scanner (via ![]() or
or ![]() )
)
The scanned pages are now displayed within the application and are ready for further processing.

If the document has multiple pages, you can set the number of rows in which the scanned document is displayed. This is done on the basis of the slider Number of rows on the right below the Upload button:
![]()
- Select one or more pages using the ctrl key and clicking the mouse
- Rotate a selected page in the correct direction using the buttons:
![]()
- Remove all scanned pages or just the selected pages that are not useful or unnecessary using the buttons:

After these pretreatments you select the document that you want to take with you for further processing. The selection can contain one or more pages.
Then click on the blue Upload button:
![]()
The following screen gives you the available options for processing the selected document.
The options that are proposed depend on the settings of your account.
TIP: Treat later:
- With this option you decide not to forward the document immediately, but you put it in the Digital mailbox for later processing.
- Adjust the document name if necessary so that the document can later be more easily identified in the relevant mailbox
- Finally click on the check mark to the right of the document name.

You will then return to the initial screen where there will be further scans ready for processing.
When all scans have been processed, click on the <I am done> button.
![]()
To upload a document, use the ‘upload document’ function located at the top of each Digital mailbox (Purchase, Sale, Various).
![]()
Within the window that opens, you can then select and upload one or more documents within a folder.

Use the<Ctrl> and <Shift> keys to selectively select multiple documents from the folder.
Click Open or Load at the bottom of the screen..
The status of the charging is then indicated, per document, via a progress bar.
After all, the selected documents are fully shown. They all receive the 'Upload' channel in the overview list.

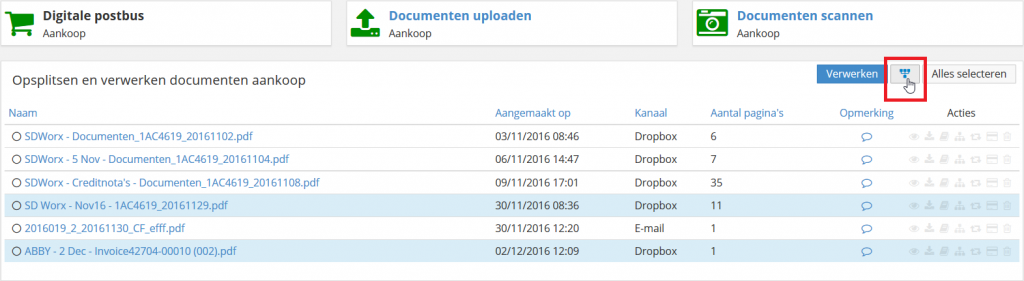
Often you want to merge two or more documents with the aim of sending them to the accounting as one new document or vice versa, splitting imported / scanned files into multiple documents / invoices.
1) Merge multiple imported documents:
- For example, you want to attach an order form as an attachment to the purchase invoice and submit them together.
- In this way, the order form is also stored in the archive (as 2nd or 3rd page) with the invoice, which does not always contain the relevant details of the purchased goods or services.
In the Digital mailbox Purchase or Sales, select the documents you wish to merge.
- Tip: Use the <Shift> and <Ctrl> keys together with the mouse to select invoices selectively.
Then click on the blue Merge icon.
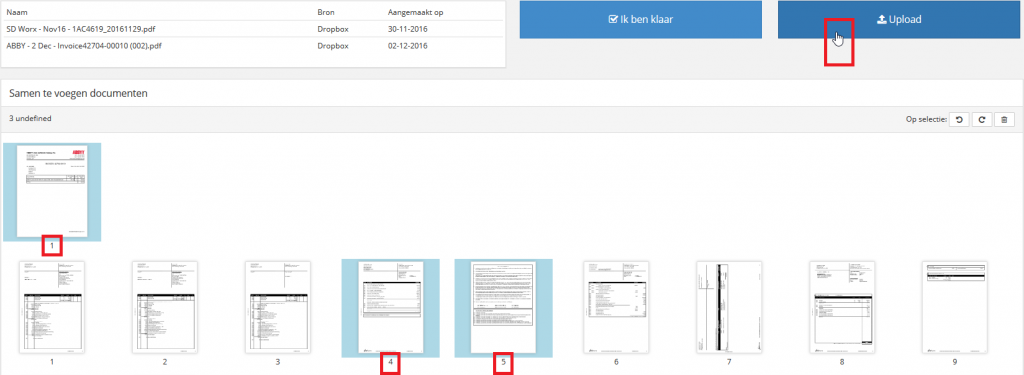
In a next step a screen opens in which all pages of the selected documents are displayed.
First place the document that contains the first page of the new document at the top. Use the arrows to the left of the document.
Then place the pages in the desired order..
Note: Respect the top-to-bottom order for the documents and left-to-right for the pages.
Finally, select the pages you wish to use for the new, compiled document by clicking on them once.
Then click on the blue Upload button to process the document (or have it processed)
You may repeat this action if you want to compose multiple documents.
Once the operation is complete, click on the blue I am ready button.
You then have the option of retaining or removing the documents that were used for the composition integrally from the relevant Digital mailbox.

Attention: Some PDF documents do not allow to be split up and (again) assembled. These are typically documents that were prepared as a PDF document at the source and where security parameters do not allow manipulation of the document.
You will be notified when such a situation occurs with the following message:

2) Split an entered file into multiple documents:
- For example, you scanned multiple invoices via a multi-feed scanning device, but you must send them individually for processing to the accounting.
Look for the document you want to split in the Digital mailbox Purchase or Sale
Then click on the Document splitting icon to the right of the possible Actions.

In a next step the known screen opens in which all pages of the selected document are displayed.
Now select the pages you wish to use for the split document by clicking them once.
Then click on the blue Upload button to process the relevant document.

You can repeat the previous action until there are no more pages for processing.
Once the operation is complete, click on the blue I am ready button.
You have the option of retaining or deleting the document that has been split up completely from the relevant Digital mailbox.
When you choose Keep current status, the pages that have not yet been processed are saved as a new document.

Attention: Some PDF documents do not allow to be split up and (again) assembled. These are typically documents that were prepared as a PDF document at the source and where security parameters do not allow manipulation of the document.
You will be notified when such a situation occurs with the following message:
In the traditional way of working, where paper documents and invoices were passed on to your office, it was sometimes easy to give a post-it or written instruction with a document.
When the invoices are digitally forwarded, it is best to use the function Comment present in the Digital mailboxes 'Purchase' and 'Sales'.

Click on the Comment icon and enter the information you want to give with the relevant document.
Then click Enter or Save.
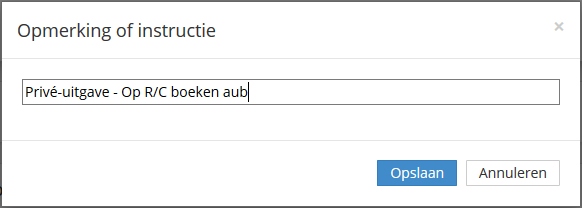
We would like to ask you to provide the following information with an invoice:
- Method (cash, private, bancontact, bank transfer, credit card or private advance) and date of payment
- If it concerns private expenses paid through the company
- When it comes to the purchase of a capital goods if you are also a trader in these goods (eg purchase of a PC for own use of a company that trades in PCs)
- Information that makes the analytical booking of the invoice possible: project number, number plate of the (company) car, policy number, ...
- Mention if it concerns a publication of Sponsorship or Gift
- …
The remark / instruction that is entered comes to the employee who processes the invoice in the accounts.
The information will then also remain accessible in the Digital Archive of your portal. It is included as 'Instruction' within the 'Detail of the booking' window..
When one or more documents have been entered and prepared in one of the digital mailboxes of your portal, these can be transferred to your accounting for processing.
Depending on the settings within your portal, the transfer of the invoices can be done with or without additional validation actions.
Attention: Invoices must always be transferred 'individually' unless otherwise agreed with your account manager. When a file with multiple invoices is uploaded or scanned, the invoices must be split up based on the functionality intended for them before they can be submitted for processing.
(see also FAQ No. 14 'How can I split or merge documents?')
- You wish to forward one specific invoice for processing:
In that case, you click on the blue hyperlink of the relevant invoice within the digital mailboxes Buying and Selling:

Within the next intermediate screen you can click on the diary within which you want the relevant invoice to be registered.
When there is only one diary available, this diary is the only one shown in blue. When multiple diaries are available, you must make a choice here.
Together with your invoice you can possibly give a comment or instruction for your account manager. Click the check mark to the right of the entry field to register the comment.

For your information: You can also use this intermediate screen to change the file name of your document. Afterwards, click the check mark to the right and Cancel if you do not want to forward the document immediately for processing.
Make your choice if multiple diaries are available:

- U wish to send multiple invoices simultaneously for processing
You select all invoices within the digital mailboxes Purchase and Sales with the Select All button:

Or, you select specific invoices within the digital mailboxes purchase and Sale with the keys <Shift> and <Ctrl> and your mouse:

Depending on the number of diaries that were set up for your company within the portal, one or more blue buttons will appear at the top right.
- Only one button (Send or Process) appears if there is only one (standard) journal for the relevant mailbox.
![]()
- Several buttons will appear if several diaries have been set up for the relevant mailbox.
In that case, click on the diary in which you wish to register the selected invoices.
Rest assured, your account manager can and will change the selected diary afterwards if this proves necessary or desirable.

After clicking the appropriate blue button, the selected invoices are forwarded for processing and appear either in the In-Processing list or in a Send list at the bottom of the vertical menu bar to the left of your portal::


The total number of documents that are ready in the relevant list is listed at the top right.
When you open the list you will find 2 tabs that separate the Purchase Invoices to be transferred from the Sales invoices, each time stating the number of documents in the relevant list.

After the invoices have been processed within your accounting, they disappear from the In processing list and are permanently included in the Digital archive of your portal, Purchase invoices and Sales invoices tabs:

- Ik select a Various document for processing:
All documents that are relevant to your bookkeeping but cannot be submitted as an invoice are submitted as a Various document.
Some examples of various documents: Contracts, agreements, articles of association, amortization tablle, investment documents, ...
After the document has been added to the digital mailbox Divers, click on the blue hyperlink of the concerning document:

Within the intermediate screen that opens, you enter the Type of document as well as the Date on the basis of which the document can be archived.
You may also wish to provide a comment or instruction for your account manager.

Once you send the document using the Send button, the document is transferred for processing within the accounting and is also immediately included in your Digital archive, Tab Various documents.
Sometimes it is useful to view the history of all imported, digitized documents within your portal.
Go to the list box that opens when you click on your user account at the top right of the screen.
Select within this list Document history:

Within the Document history you can find all documents registered within your portal.
The list is sorted chronologically according to the time of entry (= Processed at). The document that was most recently introduced is at the top.

The Source column indicates the channel through which the document was entered: scan, mail, upload, split, codabox, ...
See also FAQ No. 10: Via which channels can I enter and digitize a document?
The Type column indicates the type of document concerned: Purchase, Sales or Divers.
The Status column indicates in which step the document is located within the application.
Via the filters Status, Source, Type and Date / Date to, you can call up a specific selection of the documents included in the Document history.
With the Action 'Detail document' you get some information about the registration as well as a preview of the document.


Within the application there are two ways to change your password:
Via the login screen at the start of a new session and via My profile in an already opened session.
Change password when logging in::
On the login screen my.AccBooks.be you use the Forgot password to request a new password or to change an existing password.
After entering and confirming your Username an e-mail will be sent to the entered e-mail address with instructions on how to enter or change the new password.

Via the link in this e-mail you will reach a Reset password screen where you can enter a new, chosen password and, after a second entry (Verification), confirm with the Reset password button.

-
Attention: : Due to the emergence of the wireless networks and working remotely via broadband internet, the choice of a 'strong' password is more important than ever.
-
A secure password is a password that is at least 8 characters long and consists of both lowercase and at least 1 capital letter, and at least 1 digit. You make the password even safer by including a punctuation mark as a comma, period or question mark.
Change password within the portal during an open session::
In an open session you will find a list of options under the logged-in user in the top right-hand corner of the portal. Select My profile in this list::

You then go to an overview screen with some settings of your personal profile.
On this screen you will find the input fields at the top right of your screen to change your password:

Enter your Current Password and the New Password. After confirming the new password, click on Save.
At the next Login the new password must be entered to log in successfully.
Attention:
When a wrong password is entered when logging in to the portal, the following message will be shown in the Login screen:

If you wish to scan documents within the portal, you must install Dynamsoft's Dynamic Web TWAIN plugin.
If it appears that the plugin in question has not yet been installed on your computer, the application will ask to install the plugin via the active browser.

The installation procedure of the plugin is highly dependent on the internet browser in which the application runs.
Dynamsoft has developed a solution with this plugin for all mainstream browsers (Internet Explorer, Firefox, Chrome, Opera and Safari on Mac OS X)..
- The installation procedure for Mozilla Firefox runs as follows:
1. Save the file DynamicWebTWAINHTML5Edition.exe :

Click on <Save file>.
The file is prepared and stored under the downloads (top right in the browser).
2. Run the DynamicWebTWAINHTML5Edition.exe file:
Click on the .exe file to execute the download

Then click <Run>

3. Install the Dynamic Web TWAIN HTML5 plugin:
Click on <Next>.

Then wait until the installation is complete and click on <Close> afterwards:


4. After installation, close the open windows in Firefox (including the portal) and close Firefox yourself.
5. Then restart the Firefox browser..
6. Open your portal again and go to the Scan page.
The <New download required> popup should no longer be allowed to appear and the connected usb scanner (TWAIN compatible) will be re-selected
- The installation procedure for Safari on MAC runs as follows:
1. Save and run the file DynamicWebTWAINHTML5MACFullEdition.pkg
After click here to download the plugin the file to be executed is prepared and stored under the dpwnloads of your apple computer.

Locate the file DynamicWebTWAINHTML5MACFullEdition.pkg in the Downloads (probably at the top of the list) and double-click the file name.
2. Install the Dynamic Web TWAIN HTML5 plugin:
Click on <Continue> in the installation popup.

And then on <Install>.

Enter your password, needed to run downloads and install programs on your Apple computer.
Then click <Install Software>:

When the installation is complete, click on <Close>:

4. After the installation a security certificate needs to be made known to the Safari browser.
4.1. Click on the following URL: https://127.0.0.1:18619.
The following message appears

4.2. Click <Show Certificate> within this popup:

4.3. click the option “Always trust “127.0.0.1” when connecting to “127.0.0.1” and then click <Continue>:

4.4. Type in your password again and click on <Update Settings>:

4.5. 4.4. When the following message appears in the Safari browser, this means that the download was successful

For (technical) details regarding the above specific procedure for Safari, see also: http://kb.dynamsoft.com/questions/901/Dynamic+Web+TWAIN+-+HTTPS+is+not+supported+on+Safari+v7%7B2B%7D+on+Mac+OS+X
5. After installation, close the open windows in Safari (including the portal) and also close Safari yourself.
6. Then restart the Safari browser.
7. Open your portal again and go to the Scan page. The
TIP:
If you do not immediately find the scanner, the 'refresh' of the Scan page (via [ctrl F5]) or the restart of the browser often offers the solution.
In this FAQ you will find additional information regarding the use of the SEPA Payment Module.
Attention: The SEPA Payment Module may still have to be activated by us on your account.
Once the option has been activated, you will be able to make payments within the KMO portal at various locations on the right of the invoice via the Action: Pay this invoice).
Via the payment icon ![]() the invoices to be paid can be clicked in the [Archive Purchase invoices] and the [History Suppliers] .
the invoices to be paid can be clicked in the [Archive Purchase invoices] and the [History Suppliers] .
When the payment icon is clicked, a payment form appears with a preview of the relevant invoice (left and the payment data already available (right)
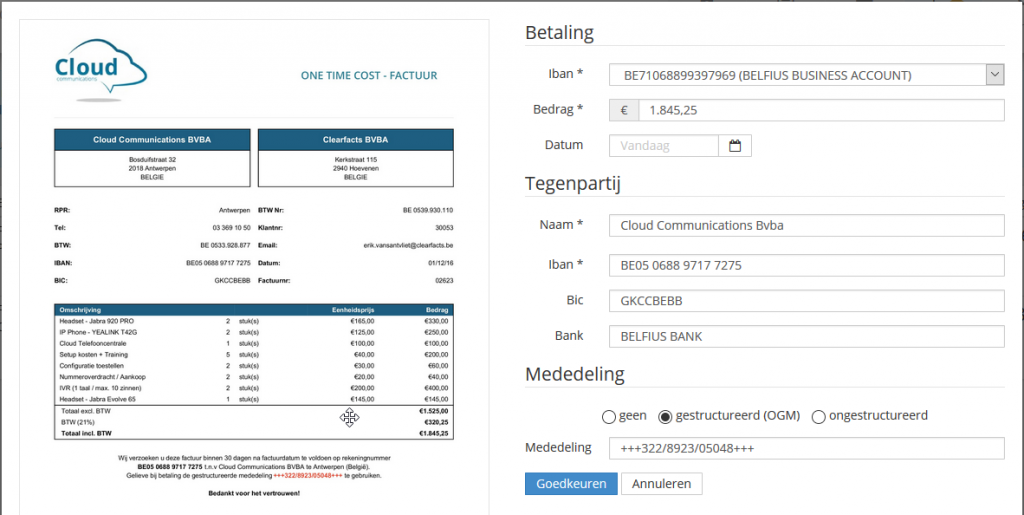
If the invoice has already been processed (typically at a previous stage), the proposed data is most likely complete and correct. There is however NO guarantee.
It therefore remains absolutely essential to confirm and possible supplement all data .
The payment proposal can then be approved and prepared for sending.

After approval a next invoice can be selected for payment or the menu [Payments] can be opened. To do this press the blue button ![]() .
.
The[Payments] menu is an extra menu that appears at the top of your SME portal after activation of the SEPA payment module.

Within the [Payments] menu two lists are made available:
1. The list of payments proposals that are were prepared but not yet allocatedto a SEPA payments file.
The fact that there are payment proposals in this list is indicated by an orange asterisk at the top left of the menu icon.

2. The list of payment proposals that that have been already confirmed and are ready for inclusion in a new SEPA file per IBAN account number .
The number of payments that are ready is indicated at the bottom right of the menu icon.
![]()
Click on the blue button at the top right to enter the list of validated payment proposals.
Within this list all payment proposals are shown that are ready to be included in a new SEPA payment file:
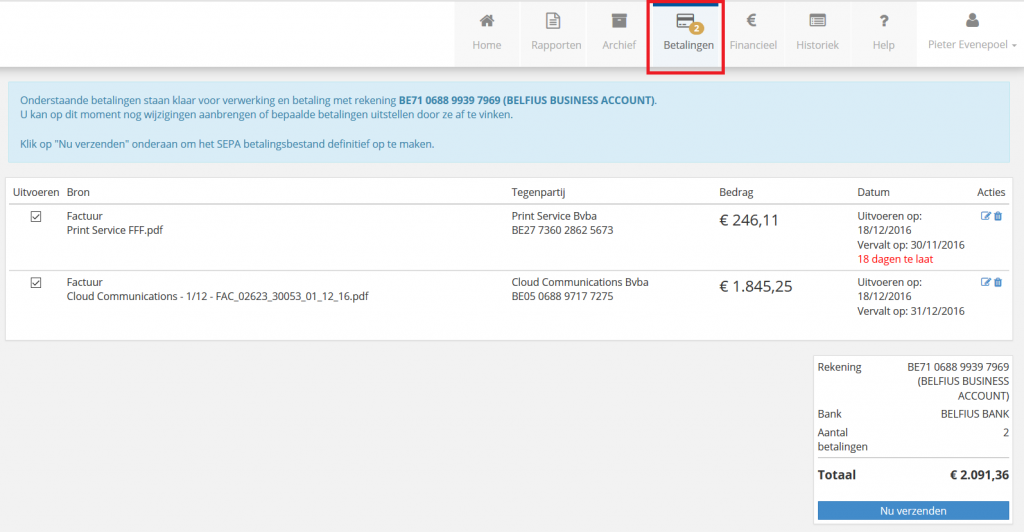
If so desired, de-select the payments that can not be included in the SEPA payment file via the checkbox at the front of the list.
Once the file is ready for production, click on the bottom right ![]()
A SEPA payment file is now generated in the background.

This is an XML file that is typically placed in the Downloads folder of your computer.
The document name starts with the IBAN account number followed by the date and time of the creation of the relevant file:
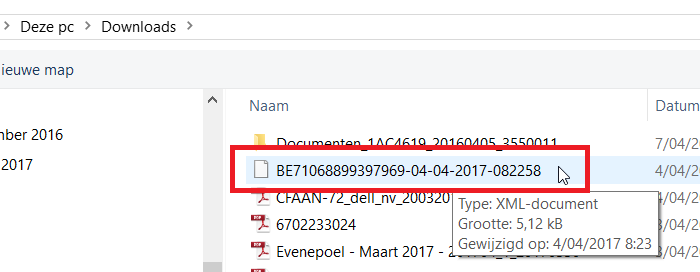
The file can then be uploaded in the (online) bank application of the bank.
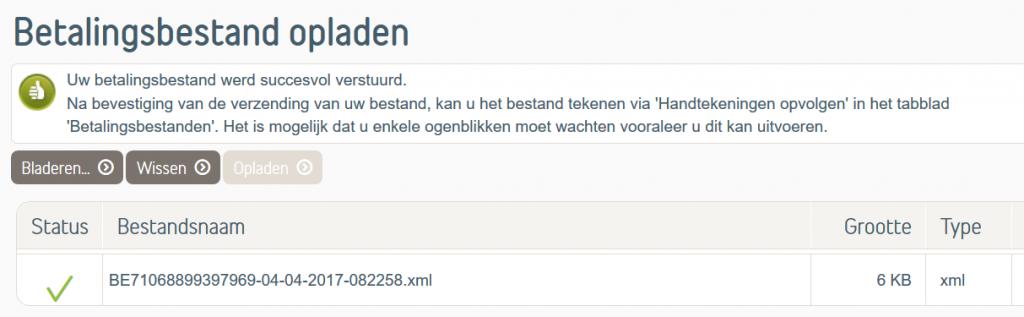
Note: Each banking application has its own specific way to charge, approve and process SEPA payment files.
In most applications, approval must be done by memo date.
It may therefore be desirable to schedule as many payments as possible on the same execution date.
All SEPA-payment files are stored within the SME.
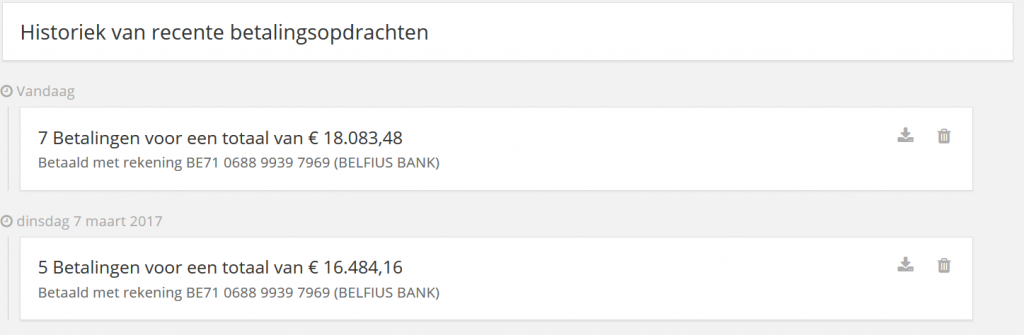
You can always find them under the hyperlink History:

Invoices submitted for payment via the SEPA Payment Module are temporarily assigned the Paid status [In Processing] in the archive.
Attention: The status evolves to 'Yes' as soon as full payment of the invoice has been recorded in your accounting.

If an invoice was only provided for 'approval' in the SEPA Payment Module (but not yet included in a SEPA Payment file), the temporary status [Appeal] is used in the Archive:
